How to Set Up Google Analytics 4 (GA4) for Your Shopify Store

To achieve success in eCommerce, you need to have a data-driven approach.
And to develop this approach, Google Analytics 4 (GA4) is one of the best tools for eCommerce entrepreneurs.
Google Analytics is a free platform that lets you collect and analyze data of your website and app visitors. These data insights help you know customer behavior and enhance your online business.
GA4 is the upgraded version of Universal Analytics. From July 1, 2023, Universal Analytics properties will stop processing data and only GA4 properties will collect data.
If you’re looking to set up Shopify GA4 configuration from scratch or migrate your existing Universal Analytics setup to GA4, we’ve got you covered. In this blog post, we’ll walk you through the step-by-step processes for both of these scenarios.
How to Migrate from Universal Analytics to GA4 on Shopify
If you already have Universal Analytics (UA) tag set up on your Shopify store, it can be migrated to the new GA4 tag in two different ways:
- You can manually migrate your Universal Analytics property to the new GA4 property.
- If you don’t manually migrate it, Google will automatically create a GA4 property for you (based on your current UA settings), unless you opt out of it through Setup Assistant.
You might think — if Google is going to do it for me, why should I manually migrate UA to GA4?
Well, here’s the answer! Google strongly recommends to manually migrate your Universal Analytics settings to the new GA4 property. It's because all UA configurations may not have the exact GA4 counterpart, and you might want to make different choices than the automated migration process.
So, here’s the step-by-step guide to manually migrate from Universal Analytics to GA4:
Step 1: Create a New GA4 Property
Open your Google Analytics account, and you’ll see this notification if you have a UA property that’s not moved to GA4:

Click on the Go to Setup Assistant button below the timer. Then, you’ll see two different options:
1. “I want to create a new Google Analytics 4 property”
2. "I want to connect to an existing Google Analytics 4 property"

If you already have a new GA4 property, you can go for option 2. However, since you’re here for migrating from UA to GA4, the most likely scenario we could imagine is that you don’t have a GA4 property yet.
If that’s the case, click on the Get Started button under “I want to create a new Google Analytics 4 property”. Then, you’ll find a pop-up with a brief description of how the setup assistant will help you.

In this pop-up, you’ll see a checkbox that says, “Enable data collection using existing analytics.js and gtag.js tags.” If your existing UA configuration is done with analytics.js and gtag.js, you can enable this option to start collecting data from those tags to your new GA4 property.
However, if you're planning to set up GA4 tags, we'd recommend keeping this unchecked, because you may end up receiving inaccurate data with double-counting. So basically, this step depends on how your UA setup was done and how you want to configure your new GA4 setup.
For this demo, we’ll leave it unchecked and click on Create and continue. Now, you’ll see two options to set up a Google tag:
1. Install with Shopify [Recommended]
2. Install manually
Since Google recommends option 1 (Install with Shopify), we’ll go with it and click Next.

Now, you’ll see a window showing ‘Installation instructions’. But you no longer need to follow these instructions as now Shopify allows you to automatically connect with your Google Analytics 4 property through Google & YouTube sales channel. Just click on Done to close this window.

Step 2: Set Up ‘Google & YouTube’ Sales Channel
2.1 Install ‘Google & YouTube’ sales channel
Now, go to your Shopify admin and click on the Sales channels tab on the left sidebar. Type ‘Google’ in the search bar to find the ‘Google & YouTube’ sales channel. Click to open it in the Shopify App Store.

Now, click on the Add app button to proceed with the installation.

Click on the Add sales channel button and complete the installation.

Learn more: How to Connect Your Shopify Store to YouTube?
2.2 Connect Your Google Account
Once you’ve installed the Google & YouTube sales channel, you’ll be asked to connect your Google account. Connect the Google account with which you just created your Google Analytics account.

2.3 Set up Google Analytics for Shopify in App Setup
Under the App setup section, you’ll find a highlighted box that says, “Looking only to set up Google Analytics 4?” Click on the Get started button in that box.

Once you click on the Get started button, you’ll go to the next page - Get started with Google Analytics 4. Since you’ve already connected your Google account, you’ll find your newly created GA4 property auto-populated in the Connect a Google Analytics property section. Click on the Connect button.

Now, your new Google Analytics 4 property is connected to your Shopify store.

Step 3: Complete Your Google Analytics 4 Property Settings
Now, go to your Google Analytics account to complete the configuration of your new GA4 property. Click on the ‘Go to your GA4 property’ button.

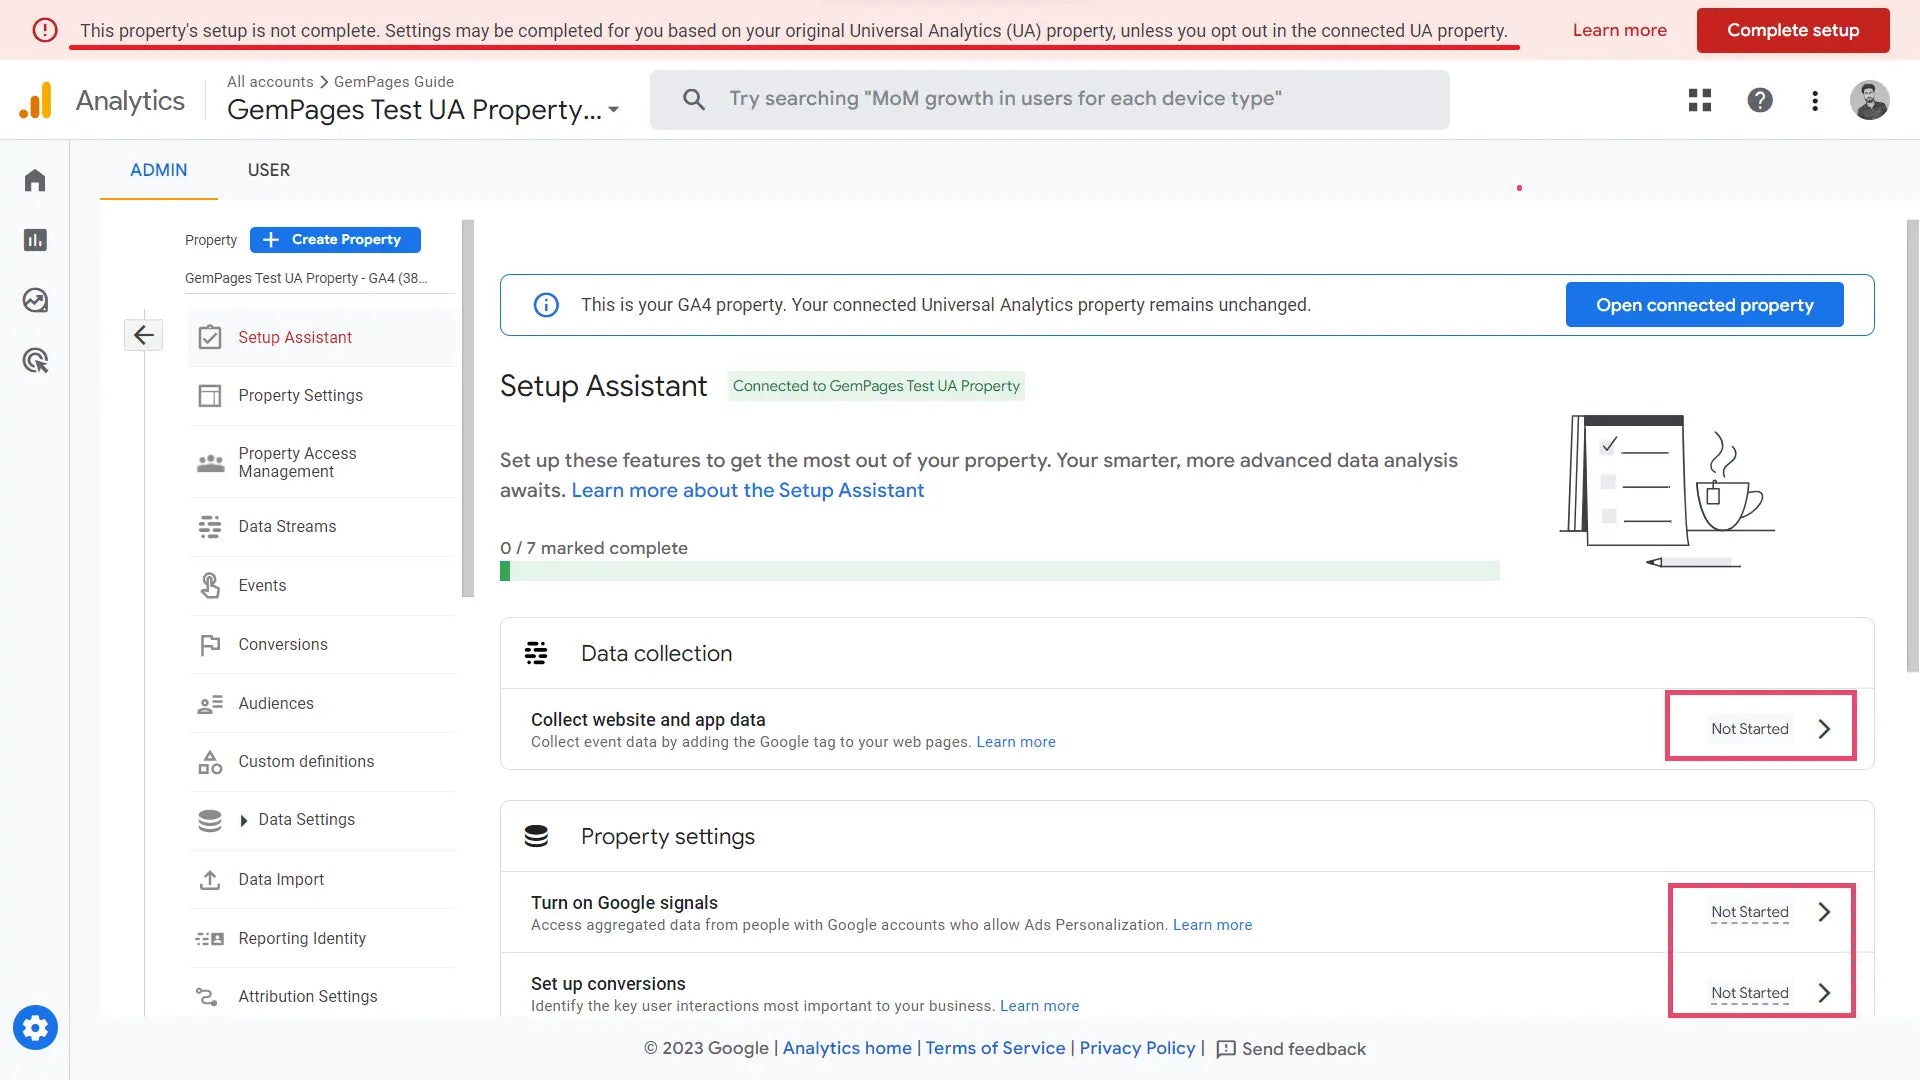
As you can see, the banner says, “This property’s setup is not complete.”

Under the Setup Assistant, you can configure settings for:
- Data collection
- Property settings
- Google Ads
- Advanced setup (optional).
Click on the arrow icon (>) next to ‘Not Started’ and you can configure all these settings one by one depending on how you want to collect the data. We’ll not go much into detail about this because these settings and the goals or data requirements may vary from business to business. You can click on the ‘Learn more’ link for each of these settings to know about them.
Set Up Google Analytics 4 (GA4) on Shopify from Scratch
If you’re totally new to Google Analytics and wondering how to install GA4 on Shopify, we’ll help you set it up from scratch. There are two different ways to add GA4 to Shopify:
- Set up GA4 with the ‘Google & YouTube’ Sales Channel
- Set up GA4 with Google Tag Manager (GTM)
We’ll cover the first method — setting up GA4 with Google & YouTube sales channel — which is relatively easy to set up.
The Step-by-Step Guide for Shopify Google Analytics 4 Setup
Step 1: Check if Google Analytics is Already Configured
First things first, make sure your store does not already have Google Analytics configured or its older version, i.e., Universal Analytics. Some store owners might have Universal Analytics configured when they initially created their Shopify stores or the developers might have done it for them.
1.1 Check Google Analytics Section:
Go to Shopify admin, click on Online Store > Preferences, and then check if you have any code in your Google Analytics section. If it’s blank, we can move forward to the further steps.

If it has the code, it means Google Analytics was installed previously. So, if you already have a Universal Analytics tag, you can migrate it to a new Google Analytics 4 tag by following the migration guide we shared above.
Or if you want to go with creating a GA4 property from scratch, remove the code, and continue following further steps in this guide.
1.2 Check the Order Status Page
The Order status page section is typically used by some merchants or developers to add the Google Tag Manager (GTM) code. If the Additional scripts box is empty, we’re good to go and can move forward with further steps. If you find a GTM container code here, we recommend removing it so that we can have a clean GA4 configuration.

1.3 Check Code in Your Theme Files
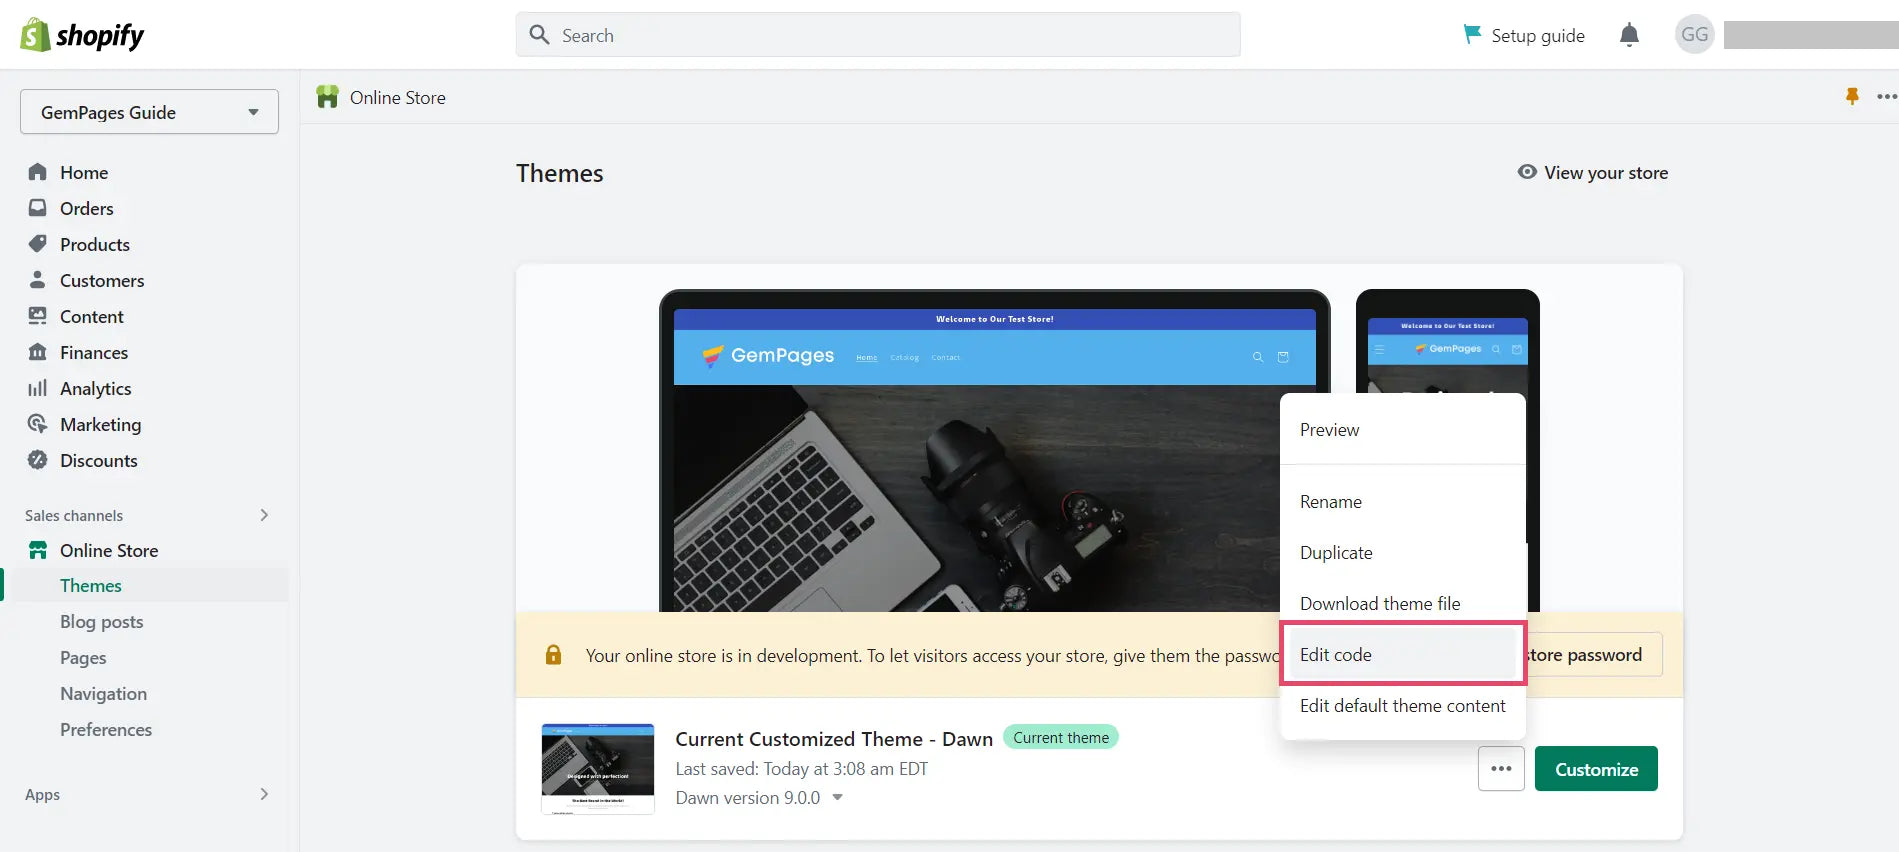
The last section we need to check is your theme file. Go to Online Store > Themes and go to more options by clicking on the three dots in your current theme section. Then, click on the Edit code option.

Click on the ‘theme.liquid’ file in the Layout folder. Check if you have a Google Tag Manager container code right below the <head> tag. If yes, remove it. If no, we can move forward to the next step.

If you had hired someone to add all these codes and you’re not sure what was added and where — you can ask for their help to remove those codes.

Step 2: Create Google Analytics Account
2.1 Create a Google Account
First, you need a Google account to create and set up Google Analytics 4. Most likely, we all have at least one Google account to use its products like Gmail, Drive, Calendar, etc. While you can use the same Google account, we’ll recommend creating a new Google account solely for business purposes.
Click here to create a Google account for your business. Fill in all the necessary details and complete the account creation.

2.2 Create a Google Analytics Account
Now, you can create a Google Analytics account with the Google account that you just created. You can find the Google Analytics signup page from Google or directly click on this link to create a Google Analytics account.
If you already have a Google Analytics account, you can click on the Sign in to Analytics button, or else, click on the Get started today button.

On the next page, click on the Start measuring button.

Then, fill in all the necessary details for account creation and create your Google Analytics 4 property.
Enter your account name:
In this field, you can mention your company name. Or if you have a parent company managing different businesses, you can insert the parent company name and then create a different property for each business website separately.
For this demo, we’ve inserted “GemPages Guide” as the account name.

Create a property:
In Google Analytics, the term “property” refers to a website, mobile application, blog, etc. — and each of them is associated with a unique tracking ID. You can have one or multiple (up to 2,000) properties in a Google Analytics account.
For example, in this demo, we’ve created a property name - “GemPages Guide Shopify Store”. If we have another website, let’s say “GemPages Design Store”, we can create a new property for separate tracking and data collection for both websites.

Right before the Next button, you’ll see a “Show advanced options” tab. You can leave it just as is—nothing is required. That option lets you create a Universal Analytics property. However, as mentioned earlier, Google will be sunsetting Universal Analytics in July 2023 anyway. So, it’s not recommended to enable this option.

If you need more help understanding how you should structure your GA4 account, here are some examples of best practices shared by Google:

Enter your business details:
Under the Industry category, select the industry type most relevant to your business. Under the Business size, click on the right option per the number of employees working under your business.

Choose your business objectives:
Depending on your objectives and requirements for the reports, you can choose one or more options in this step.

Review and accept the Google Analytics Terms of Service Agreement:
Once you click the Create button, you’ll see a pop-up window with Google’s terms of service agreement. Make sure to choose your country/region before you review and accept the terms of service agreement.

Choose your platform:
Since we want to collect data from our Shopify website, we’ll choose the first option Web. But if you want, you can also skip this option by clicking on the Skip for now button.

Set up your data stream:
Enter your Website URL (custom domain name) and create a Steam name. Make sure that the Enhanced measurement option is enabled. It'll help you automatically measure the interactions of your website visitors on top of the standard page view measurement.
Once done, click on the Create stream button.

Then, you’ll see the Installation instructions window. Just close it and go to the second window - Web stream details.

Add conditions to list unwanted referrals:
Under Web stream details, go to Configure tag settings > Settings, and then click on ‘Show all’. Then, click on List unwanted referrals. Add conditions here to ensure that self-referrals won’t display in your GA4 reports.
You can add conditions to ignore referrals coming from your myshopify.com domain and the custom domain. Once conditions are added, click Save and close the window.

Once setup is completed, you may see this page that says, “It may take up to 48 hours before your property starts collecting data.”

Step 3: Set Up ‘Google & YouTube’ Sales Channel
3.1 Install ‘Google & YouTube’ sales channel
Now, go to your Shopify admin and click on the Sales channels tab on the left sidebar. Type ‘Google’ in the search bar to find the ‘Google & YouTube’ sales channel. Click to open it in the Shopify App Store.

Now, click on the Add app button to proceed with the installation.

Click on the Add sales channel button and complete the installation.

3.2 Connect Your Google Account
Once you’ve installed the Google & YouTube sales channel, you’ll be asked to connect your Google account. Connect the Google account with which you just created your Google Analytics account.

3.3 Set up Google Analytics for Shopify in App Setup
Under the App setup section, you’ll find a highlighted box that says, “Looking only to set up Google Analytics 4?” Click on the Get started button in that box.

Once you click on the Get started button, you’ll go to the next section - Get started with Google Analytics 4. In this section, since you’ve already connected your Google account, you’ll find your GA4 property auto-populated in the Connect a Google Analytics property section.
Now, it’s time to connect Shopify to Google Analytics 4. Click on the Connect button to link the GA4 property with your Shopify store.

And that’s it! You’ll see the message saying —
"You've successfully set up Google Analytics 4".


How to integrate GA4 into GemPages?
While not all GemPages users require GA4 integration, it becomes necessary for store owners who plan to conduct A/B testing campaigns.
A/B testing is a valuable practice for store owners looking to make data-driven decisions, enhance user experience, and ultimately boost their overall conversion rates.
Step 1: Setup Shopify Google Analytics 4
Check the detailed instructions above on The Step-by-Step Guide for Shopify Google Analytics 4 Setup.
Step 2: Connect your A/B testing campaign
2.1 From the GemPages Dashboard, click on Settings in the left corner. Select Store settings then.

2.2 Under Analytics Tools, toggle on the Google Analytics switch. Choose the Google Account you want to connect to and allow the connection by agreeing to Google’s terms and conditions.
2.3 Choose the Accounts and Properties you’d like to track with A/B Testing. 
Now you’ve successfully synced your Google Analytics data with the A/B testing campaign report!


 Facebook Community
 Change Log
 Help Center


