How to Add Afterpay to Shopify in 5 Easy Steps

One of the keys to conversion is to make ‘buying’ easier for your customers.
And Afterpay can help your customers do the same with its payment service.
Afterpay is a payment option that allows your customers to purchase a product or service with a “buy now, pay later” option. Thus, customers can complete their payment in four installments of equal amounts—without any interest.
In this blog post, we’ll help you with a complete guide on how to add Afterpay to Shopify, its requirements, and the benefits of using Afterpay on your Shopify store.
Setting Up an Afterpay Account
First, let’s understand how you can set up an Afterpay account and what are the requirements to do so.
Creating an Afterpay Account
To add Afterpay to your store, you must first create an Afterpay retailer account. Go to Afterpay’s website and complete the signup by filling in the necessary details.

Once you complete the signup process, you should be able to get the Afterpay merchant ID and security key. You can use those details when configuring Afterpay on your Shopify store (more on it later in this blog).
What are the Requirements to Add Afterpay to Shopify?
Before we go into the details of how to set up Afterpay on Shopify, let’s understand all the requirements or eligibility criteria to add Afterpay to your Shopify store.
Countries Supported by Afterpay:
At the time of writing this article, Afterpay is available to Shopify merchants only in the following countries:
- United States
- Australia
- New Zealand
- Canada
- UK (Clearpay)
Eligible Store Address:
It's mandatory that your store address matches the Afterpay account region. To check if your store address is updated correctly, go to Shopify admin and then click on Settings > Store details.
Under the Billing information section, your Business address must have one of the following countries: United States, Australia, New Zealand, or Canada.
Eligible Store Currency:
Just like the store address, your store’s currency must also be set as per the respective Afterpay account region. Thus, only the following store currencies are eligible for Afterpay:
United States Dollars (USD), Australian Dollars (AUD), New Zealand Dollars (NZD), and Canadian Dollars (CAD).
You can check your Store currency from the same tab: Settings > Store details. Right below the Billing information section, you’ll find the Store currency section.

Payment settings:
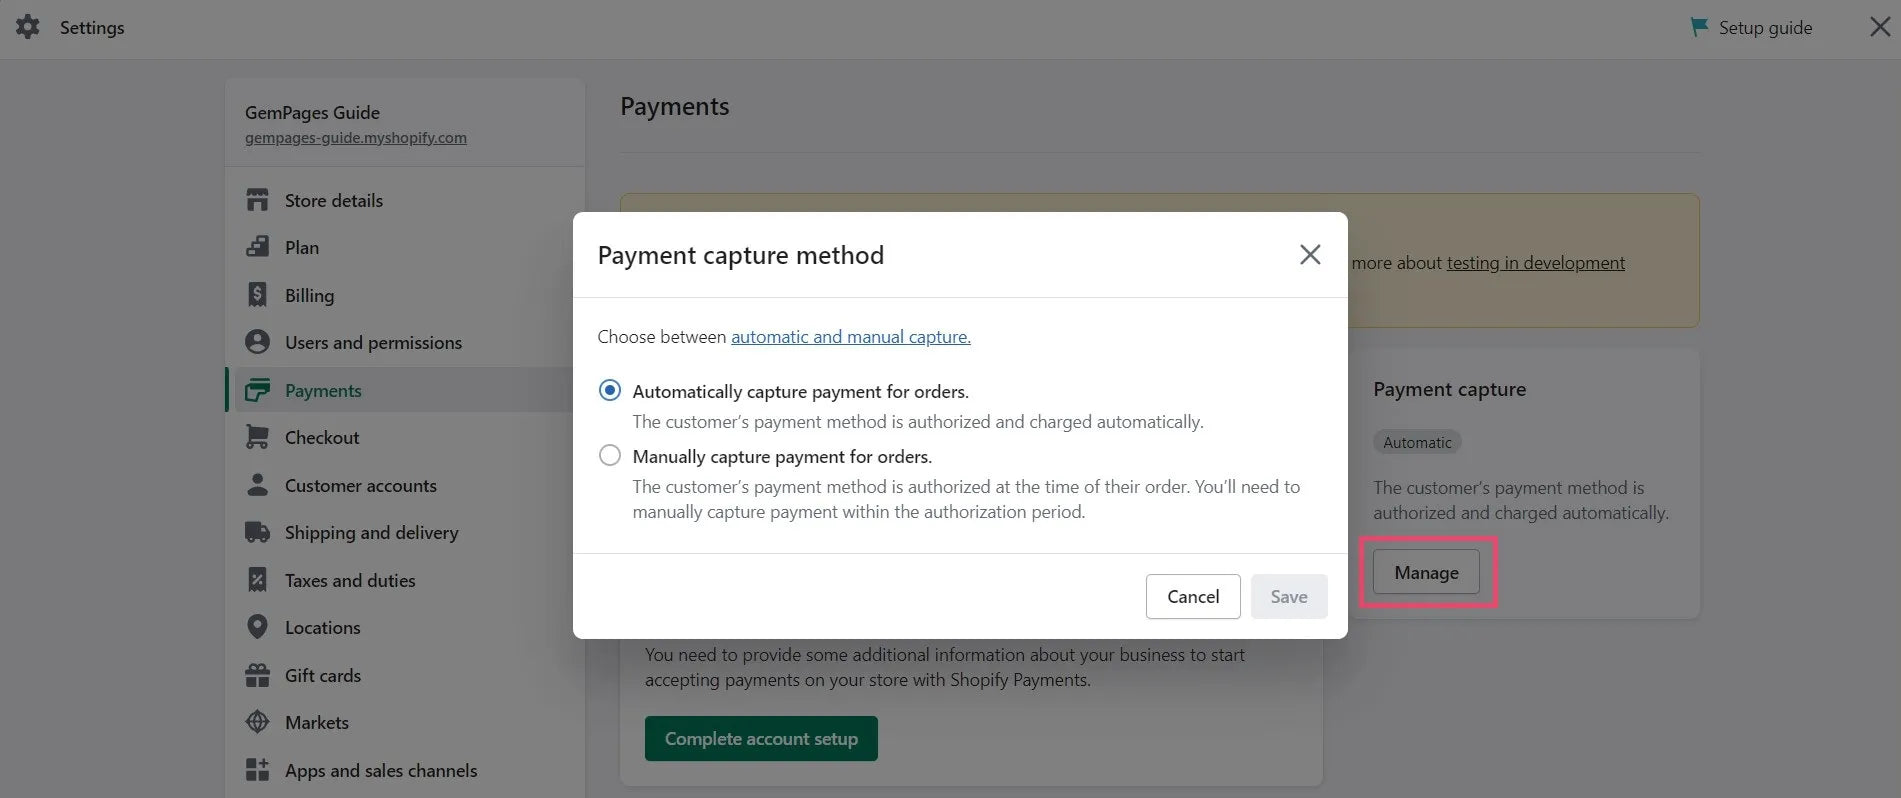
In your Payments setting, check if the following option is enabled: "Automatically capture payments for orders". To check this, go to Shopify admin and then click on Settings > Payments.
Then, click on the Manage button under the Payment capture section.

Note: Some Shopify merchants may prefer the second option, i.e., "Manually capture payment for orders". If you have that option enabled on your store, follow the instruction provided under Afterpay's Developers Guide.
How to Install Afterpay on Shopify
Now that your Afterpay retailer account is ready, it’s time to add Afterpay to your Shopify store. Follow these simple steps to complete the process:
Step 1: Go to Payments Setting
Go to Shopify admin and click on Settings > Payments. Scroll down and click on the Add payment methods button under Additional payment methods.

Step 2: Search for the Afterpay Payment Method
You’ll see two search bar options: Search by payment methods and Search by provider. Click on the second one (Search by provider) and type “Afterpay” in the search bar.
You’ll find the option - Afterpay (New). Select it and click on the Activate button.

Step 3: Install the Afterpay App to Your Shopify Store
Then, click on the Connect button under Account status.

You’ll be asked to install the Afterpay app. Go through the privacy and permission details and proceed with the installation by clicking on the Install app button.

Step 4: Sign in to Your Afterpay Retailer Account
Once installed, you’ll be redirected to the Afterpay onboarding page.
Enter your store’s country and log in either via your email address or activate Afterpay using your merchant ID and secret key. You must’ve received this ID and key when you completed onboarding for the Afterpay retailer account.

Step 5: Activate Afterpay on Your Shopify Store
Once you've completed the sign-in, you'll be redirected back to the payment settings in your Shopify admin. Click on the "Activate Afterpay (New)" button and the Afterpay payment option will be activated on your store.

How to Add Afterpay to Your Shopify Product Pages
Once you’ve completed the installation process for Afterpay, make sure that you display the messaging about Afterpay on your product page. This is an important step as it will help you convey to customers that you’re offering the installment payments option through Afterpay.
Duplicate Your Theme (Optional Step)
Since this process requires a small edit to your Shopify theme’s code, it may seem like a daunting task to someone who’s not tech-savvy. However, there’s nothing to be worried about. It’s quite simple to edit your code in this case and it does not require technical expertise.
If you still feel worried about it, you may also keep a copy of your current (customized) theme by creating a duplicate theme for backup. And if anything goes wrong, you can go back to your previous theme.

Step 1: Go to the guide on Afterpay Product Page Display in Afterpay’s Developers Guide. Then, click on the Copy to Clipboard button to copy the ‘Shopify-Afterpay JavaScript Snippet’.

Step 2: Go to your Shopify admin and click on Online Store > Themes.
Click on the more options button (three dots) in the Themes section. Then, click on the Edit code tab in the list.

Step 3: Under the Layout folder in the left sidebar, click on ‘theme.liquid’. Scroll down to the bottom of the ‘theme.liquid’ file section.

Step 4: At the bottom of the ‘theme.liquid’ file section, hit Enter once to keep one line’s space. Paste the JavaScript snippet/code that you copied from Afterpay’s Developers Guide. And then, click on the Save button and exit the Edit code tab.

Step 5: Open your website and go to any of the product pages and review if the Afterpay assets (logo and installment amount) are visible.
Here’s an example of how the Afterpay assets could appear on your store:
(This visual may differ slightly depending on your store’s theme and layout.)

Benefits of using Afterpay on Shopify
- Increases your conversion rates by allowing customers to pay in installments instead of all at once.
- Reduces cart abandonment rates by making purchases more affordable and manageable with installment payments.
- Attracts new customers who are interested in your product but may not have been able to afford full payment upfront.
- Offers a seamless checkout experience with the Afterpay payment method.
- Provides a risk-free payment option for customers as Afterpay pays the merchant upfront and assumes the risk of non-payment.
- Boosts customer loyalty and repeat business as customers are more likely to return to your store when they’ve previously enjoyed the benefits of Afterpay.
- Helps to increase average order value as customers are able to purchase more items in one transaction.
Learn more: Shop Pay vs Afterpay: What Is The Key Difference?
Conclusion
Offering Afterpay on your Shopify store encourages your customers to buy their favorite products. With the flexibility of installment payments, customers can easily purchase expensive products, too.
Ultimately, the comfort of easy installment payments can result in enhancing your store’s sales and conversions. This can help you grow your business faster.
Last but not least, you need to keep your competitors in mind. If they’re offering Afterpay or any similar payment method, you also need to offer Afterpay to stay ahead of the competition.


 Facebook Community
 Change Log
 Help Center


