How to Migrate from Magento to Shopify in 8 Steps (+Tips)

If you’re looking to switch from Magento to Shopify, one thing’s for sure —
You’re going to love the powerful platform that Shopify provides to its millions of merchants across the globe.
However, when making such a significant shift, it’s quite understandable that you might be concerned about the whole process of migrating from Magento to Shopify.
In this blog post, we’ll help you with the crucial aspects you should know for Magento to Shopify migration along with the step-by-step guide to help you in moving from Magento to Shopify.
Magento to Shopify Migration Checklist
Let’s quickly review the checklist that you should keep in mind when you migrate from Magento to Shopify:
1. Create & Set Up Your Shopify Store- Create your Shopify store account
- Choose the Shopify plan as per your business needs
- Configure Shopify settings
3. Backup & Prepare Your Magento Store’s Data
- Create a backup of your Magento store’s data
- Export the data from your Magento store in a CSV file format
- Format your Magento store’s data as per Shopify’s standard CSV format
- Import the CSV file into your Shopify store
- Optional: Use a third-party migration app if needed
- Choose the right Shopify theme for your store
- Customize and design your Shopify store
- Create product collections
- Update your URLs on Shopify
- Review to see if migration is done correctly
- Perform testing to double-check the store’s functioning

Important Things to Know Before Magento to Shopify Migration
Before you begin the process of migrating Magento to Shopify, you should be aware of some important aspects of the migration process. Basically, we’re talking about what data you can migrate and which ones you can’t migrate directly.
What data can be migrated from Magento to Shopify:
1. Products:
- Name, full description, SKU, status, and manufacturer.
- Price and special price.
- URL, meta title, and meta description.
- Weight, variants, quantity, and manage stock.
- Product image and additional images.
2. Product categories:
- Name, description, and status.
- URL, meta title, and meta description.
- Image
3. Manufacturers:
- Name
4. Customers:
- Email, customer group, and newsletter.
- Billing address
- Shipping address
5. Orders:
- Order ID, order date, order status, and order products.
- Product price, and order quantity.
- Customer name and billing address
- Shipping address
6. Coupons
- Name, coupon code, discount type, and discount amount.
7. Reviews:
- Created date, rating, user name, comment, product, and title.
8. CMS pages:
- Static pages such as the about us page, contact page, and policy pages.
What can’t be migrated directly to Shopify from Magento:
1. Magento-specific elements:
- Magento custom extensions, Magento theme, and multi-store setup.
- Magento Store Credits
2. Blogs pages
3. Customer passwords
4. Discounts
Step-by-Step Guide to Migrate from Magento to Shopify
Step 1: Create & Set Up Your Shopify Store
Creating your Shopify store is fairly easy! Shopify offers a 3-day free trial and then just $1 for the next three months. And that’s a good enough time to review and test the platform in and out.
However, you may have to invest some time in setting things up. But don’t you worry, we got you covered with that as well. We’ve created a step-by-step Shopify tutorial for you to make things simple!
Once your $1/month subscription is over, you can choose a regular Shopify plan depending on the scale of your business and requirements. If you’re a small business, the Basic Shopify ($29/month) plan should be good enough.

Step 2: Notify Your Customer about the Migration
Keep your customers informed about the migration process, the expected downtime, and the expected completion time, so they are aware of what is happening.
You don’t want your customers to make any sort of assumptions or feel concerned during the downtime. Thus, it’s advisable to keep them posted for the expected downtime or any significant changes that may impact them in any manner.
Send out an email to all your newsletter subscribers. Being proactive in such scenarios not only avoids customer complaints but also boosts the trust of your customers toward your brand.
Pro tips: Choose a low-traffic time to schedule your migration process to minimize the impact on your customers and business. If you’re selling in just one country, you can choose a time when people are most likely to be sleeping.
However, if you’re selling in multiple countries, you may do some site visit analysis to figure out the usual time when your website has the least number of visitors.
Step 3: Back Up Your Magento Store
Now, it’s time for a critical step in the process, i.e., to safeguard your Magento store’s data by backing it up. This helps ensure your Magento store’s data remain intact if anything goes wrong while migrating your store to Shopify.
To create a backup of your data, go to your Magento admin, and click on System > Tools > Backups. You’ll find three different options for backup:
1. System Backup: As the name suggests, this option helps you create a complete backup for the entire system, which also includes the database and file system.
2. Database and Media Backup: This option helps you create a backup for your database and media folders.
3. Database Backup: This is a database-only backup.

Select the backup type as per your needs and create a Backup Name for your backup.

Step 4: Export Data from Your Magento Store
Now, let’s export the data from your Magento store that will go into your Shopify store. You just need to follow these simple steps to do so:
- Go to your Magento admin, and click System > Data Transfer > Export.
- Then, enter the Entity Type (Products) and select the Export File Format: CSV.
- And then, export your data for products.
Apart from products, you’ll find two other types: Customer Main File and Customer Addresses.
You can repeat the process for each entity type to export the CSV files as needed. Once you complete the export process for all entity types as required, you’ll have CSV files ready to be imported into your Shopify store.
Step 5: Import Your Data from Magento to Shopify
Now that we have the data ready, we can proceed with importing Magento data into the Shopify store. To do this, you have two different options:
1. Import Magento Data to Shopify via a CSV file
2. Use the Shopify app to import your data
Import Magento data to Shopify via a CSV file
You can upload a CSV file to Shopify to bulk-upload products. This feature can also be helpful when merchants want to make bulk edits to their products.
Important note: Make sure that your CSV file is properly formatted to be accepted by Shopify’s system. You can download Shopify’s sample CSV format and format your CSV file accordingly.
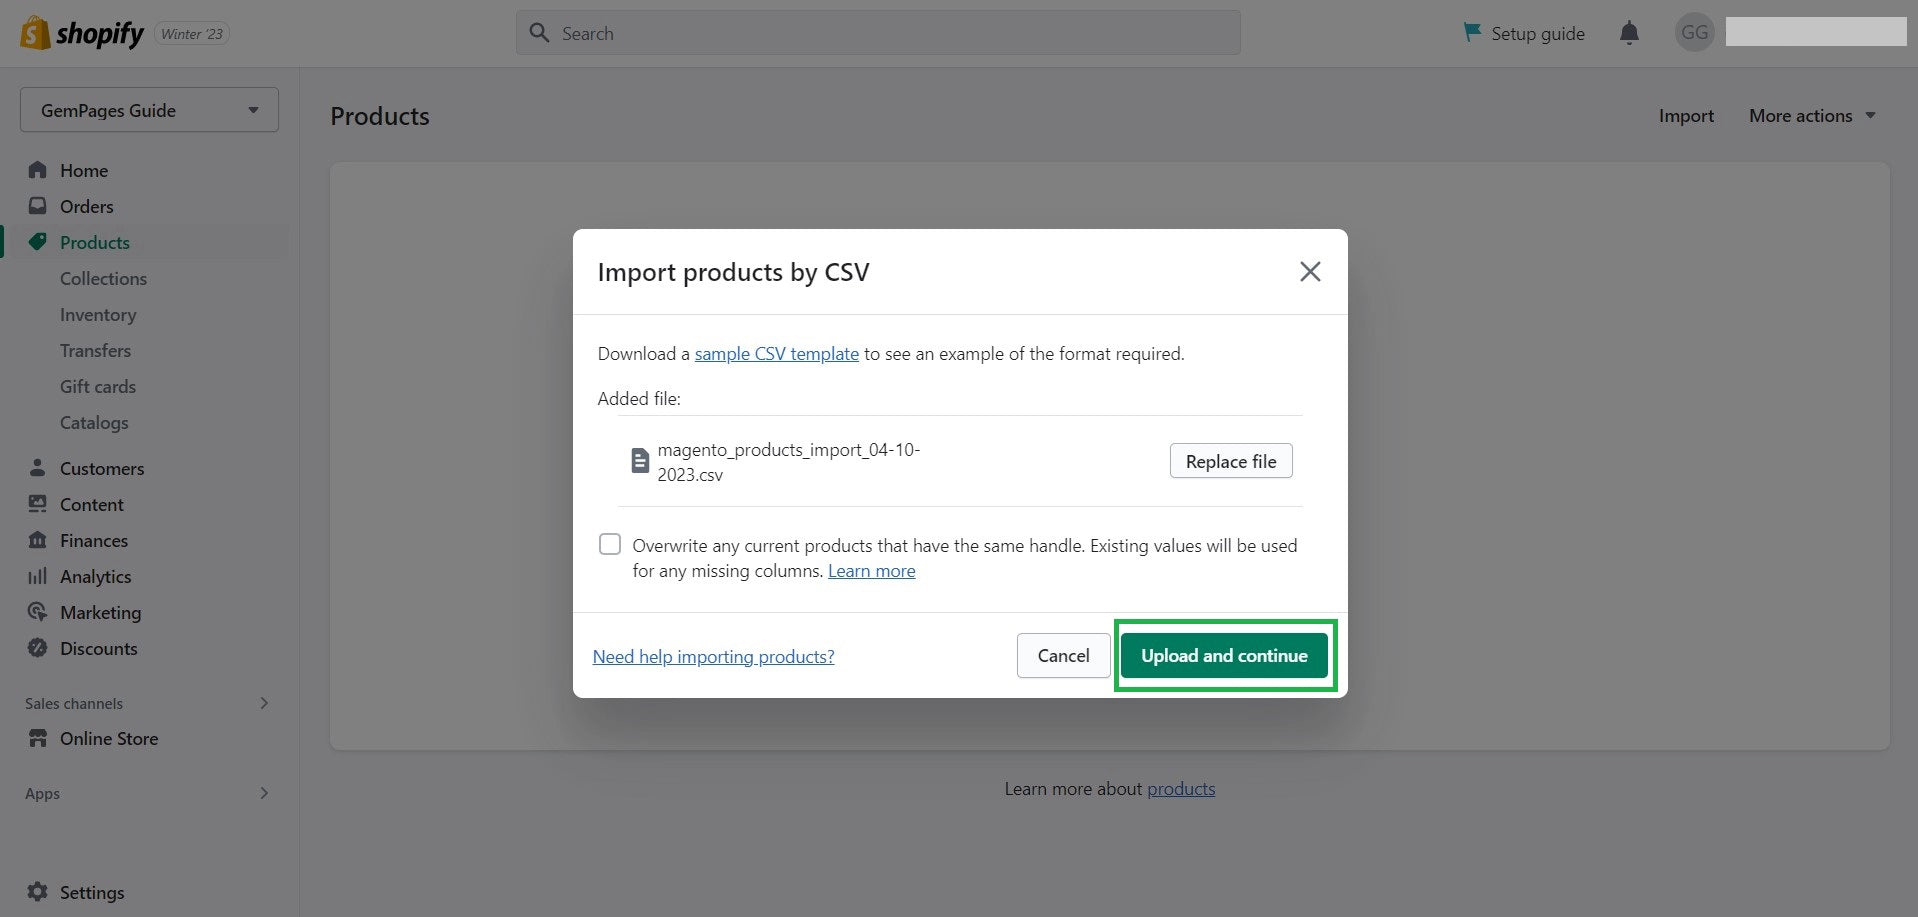
Once you have the data ready in the CSV file, click on the Add file option in the section that says Import products by CSV.
The checkbox that says - “Overwrite any current products that have the same handle. Existing values will be used for any missing columns” - is primarily for the existing Shopify store that may have some products already created or live on their store. Since you’re uploading the CSV file to a brand new store, most likely, you won’t have any product in your Shopify store yet. Thus, you can keep this field unchecked.

Once you’ve added the file, click on the button that says Upload and continue. Your data will be imported shortly.

- Keep in mind that the CSV file can help you upload the text data only. It won’t upload your images to Shopify. Thus, your product images must be on an existing website. You can copy your current image URLs and insert them in the CSV file.
- The image URLs are used in the CSV file importing process only, and once it’s completed, you can delete those URLs.
Import Magento Data to Shopify via a third-party app:
Alternatively, you also have the option to import Magento data to Shopify via a third-party app. Here are some Magento to Shopify migration apps that you can check out:
Step 6: Customize Your Shopify Store
Now comes the exciting part—customizing and designing your Shopify store!
By default, you’ll have the Dawn theme in your Shopify admin. If you want, you can keep the same theme as it’s free. Or you also have plenty of other free as well as paid options if you’d like to change your default theme.
Learn more: How to Choose The Right Shopify Theme for Your Store
Once you’ve finalized your theme, you can start customizing it. You can use Shopify’s theme editor for some basic customization. However, if you want to take your Shopify store’s design to the next level, you can use GemPages - landing page builder app.


Make sure that you have all the important store pages created and designed nicely. Apart from the homepage, other store pages like the about us page, store policies, and the contact page are also crucial for your store.
Review and update your URLs on Shopify. This is to ensure that your URLs are the same on Shopify as they were on Magento to avoid broken links and lost traffic.
Shopify Tutorial: Set Up Your Store from Scratch to Finish
Shopify Customization: How to Build Custom Shopify Pages That Sell
Step 7: Review & Test Your Shopify Store
Once you’ve imported the data and customized your Shopify store, it’s time to check if everything’s done correctly.
Review and analyze your overall store. You may also ask for feedback from others. Also, don’t forget to test your store’s functioning by placing a couple of test orders.
The goal is to review and ensure that your order processing flow, email notifications, payment gateway, checkout process, and Shopify apps are functioning as intended.
Important note: Make sure that payment gateway testing is done only after enabling the test mode in the payments settings. During the test mode, your customers can’t use real credit or debit cards. So, this needs to be completed before your officially launch your store. Also, you should enable password protection during the testing.
Learn more: Shopify Tutorial > Test Your Store
Step 8: Officially Launch the Shopify Store
Once everything is completed, reviewed, and tested successfully; you can officially launch your Shopify store.
To remove the password protection from your store, simply go to your Shopify admin, and then click on Sales channels > Preferences > Password protection. Uncheck the box that says “Restrict access to visitors with the password”.
And that’s it! Your Shopify store is now live and ready to start selling!
Conclusion
Shopify is considered one of the best eCommerce platforms in the world and there are multiple reasons behind its immense popularity.
One of the major advantages of Shopify as a platform is its solid ecosystem; which includes, merchants, Shopify Partners and Experts, app developers, and theme developers.
Switching from Magento to Shopify is definitely a decision that you won’t regret.


 Facebook Community
 Change Log
 Help Center


