How to Add Tabs in Shopify Product Pages in 5 Minutes

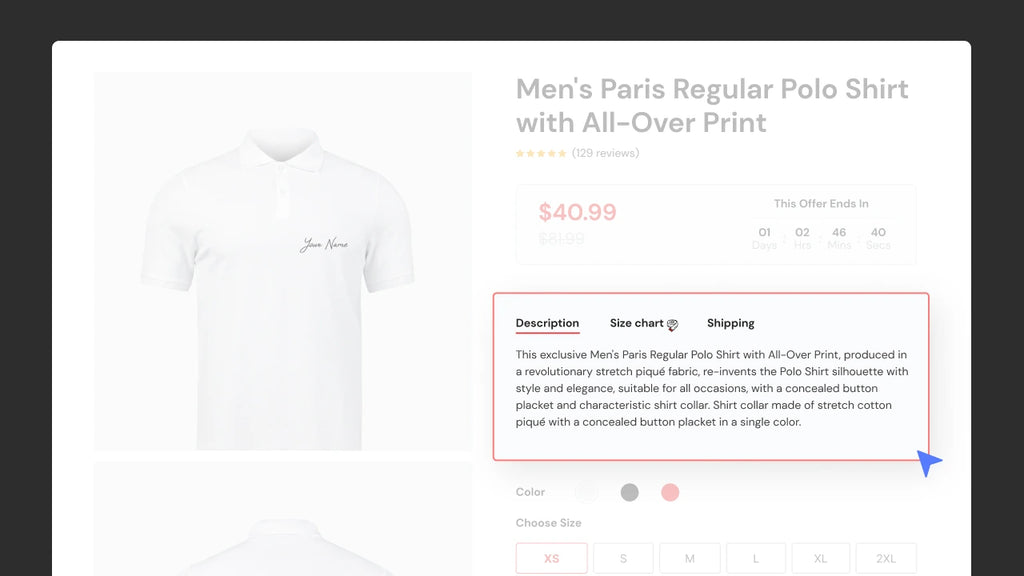
Online shoppers expect easy navigation, organized information, and a clutter-free interface when browsing product pages. One effective way to achieve this is by adding tabs to your Shopify product pages. Tabs allow you to neatly compartmentalize product details, making it easier for customers to find the information they need quickly and efficiently.
In this guide, we will explore the benefits of adding tabs to Shopify product pages, as well as various methods for implementing them in the smartest and fastest way.
Why Add Tabs to Shopify Product Pages?
1. Improved User Experience
Online shopping can sometimes feel like wandering through a big store with no signs. You're searching for a product and have to navigate through lots of pages and text. It can be confusing and frustrating. Tabs change that.
Tabs are like little labels on the shelf that say what's inside. Each tab is like a section where we put different types of information. For example, one tab has product details, another has customer reviews, and one more has shipping info. It's like putting everything in its own neat box. This makes it easy for shoppers to find what they're looking for without getting lost.

Make your product detail page neat might drastically enhance user experience.
2. Enhanced Organization of Product Details
Tabs allow you to categorize product information effectively. You can separate specifications, reviews, shipping information, and more into distinct tabs, streamlining the user's navigation process. This enhanced organization can lead to increased user engagement and higher conversion rates.
Below is an example from apolloindustriesllc.com.

A good way to present information about the product without redirecting your customer many times is using product tabs.
3. Reduced Clutter on Product Pages
Have you ever walked into a messy store? It's overwhelming, right? Online stores can be the same. Lots of text and pictures can make it hard for customers to focus on what they want. But tabs are like those neat containers that keep things tidy. When a shopper clicks on one, it's like opening a box. They get the details they want, and everything else stays neatly packed away. This helps reduce the mess and confusion on your store's pages.

Don't let customers down by too many words with too crowded demonstrations. Product tabs can reduce the clutter on product detail pages.
How to Add Tabs in Shopify Product Pages
Now that you understand the benefits of using tabs, let's explore how to add them to your Shopify product pages.
Method #1. Using Shopify Themes
Shopify offers a wide range of themes that come with built-in tab functionalities. Here's how you can add tabs using a Shopify theme:
Step 1: Log in to your Shopify admin > Online Store and click Themes > Navigate to Theme Library and choose Visit Theme Store dropped down from Add theme button.

Step 2: Choose a theme that supports tabbed product pages and hit Try theme.

Tip: If you want a free Shopify theme that supports product tabs feature, you can consider the Origin theme.
Step 3: Once you've selected a theme, Shopify will navigate you back to the Theme dashboard with a note showing that the theme is being configured to your store. You will need to wait until the configuration is ready.

Step 4: Once the chosen theme is added successfully, click the respective Customize button.

Step 5: Add and customize tab content by filling in the relevant information, such as product descriptions, specifications, reviews, and more.
Step 6: After customizing the tabs to your liking, click save and publish the changes.
Pro Tips: In each Shopify theme, the product tabs feature will be disclaimed under the feature description. You can identify which theme offers this accessibility without needing to click the preview buttons.

Learn more: Shopify Theme Detector: How to Check What Shopify Theme A Store is Using?
Method #2. Using Custom Code
If you want more control over the design of your tabs, you can implement them using custom code. Here's a basic guide of how to do it:
Step 1: In your Shopify admin, navigate to Online Store > click on Themes > … (Actions) > choose "Edit Code"

Step 2: Within the code editor, locate the product template file (usually product.liquid) > add the necessary code to create tabs. This might involve HTML, CSS, and JavaScript.
You can have more code guides here.
Step 3: After making the code modifications, save your changes and preview your product pages to ensure the tabs appear and function as intended.
Important note: This method is more complex than the previous one, and we do not recommend following it unless you are proficient in coding. Otherwise, there's a risk of code mixing. The best option is to use a pre-built solution, such as a Shopify landing page builder app.
How to Add Tabs in Shopify Product Pages Using GemPages v7
GemPages is a user-friendly and powerful Shopify page builder that simplifies the process of adding tabs to your product pages. Let's take a closer look at how to use GemPages v7 to add product tabs to your PDP in a smartest and fastest way.

Method #1. Using GemPages’s Tab Element
Using tab elements is one of the quickest ways to add product tabs to your existing product page. Follow these below steps or you can read GemPages’ Help guide on Tab element to get the most out of the feature.
Step 1: Install GemPages > Go to the Create landing page using link or image.

Step 2: Within the GemPages Editor > Navigate to the left sidebar > Search for Tab in the search box.

Step 3: Drag and drop the element to the design area and customize information.
You can click on each tab element to add and customize content, such as product specifications, reviews, and more. Also, you can easily format text, add images, and organize information.

Step 4: Ensure that your tabs are optimized for mobile devices by previewing and adjusting the layout as needed.
Step 5: Once you're satisfied with your tabbed product page, save your changes and publish it to make it live on your Shopify store.
Method #2. Using GemPages’ Pre-built Templates
This option might be ideal for you, store owners, who are unsure about how to design your product detail page.
You can consider these pre-made templates for Virtual Reality Headsets as your starting point within our continuously growing list of templates.
Step 1: Install GemPages > Get into GemPages dashboard > Click Create page using image or URL.

Step 2: Navigate to Template library > Select Product page > Find the templates having product tabs > Add to page the chosen one.
Step 3: Customize and add information about the products and hit Publish.
From here, you can not only customize the information but also adjust the number of tabs and how they are displayed using GemPages' element settings.

Tip: You can get a preview for all the GemPages’ proprietary templates here.
Tips for Using Tabs Effectively to Improve User Experience
While adding tabs to your Shopify product pages is a great way to enhance the user experience, it's essential to use them effectively. Here are some tips to get the most out of tabs:
1. Use Descriptive Titles
Create tab titles that clearly describe the content within each tab. For example, "Product Specifications," "Customer Reviews," "Shipping Information," etc. Descriptive titles make it easier for users to find the information they're seeking.
Learn more: How to create a testimonial page using GemPages.
2. Prioritize Information
Identify the most critical product details or information your customers are looking for, such as specifications, reviews, or FAQs. Place essential information in the default or first tab to ensure it's immediately visible to users.
3. Utilize Icons or Symbols
Consider using small icons or symbols next to tab titles to provide visual cues about the content. For example, a star icon for reviews or a question mark for FAQs. Icons can quickly convey the nature of the information within each tab.
4. Maintain Consistency
Consistency is key in providing a smooth user experience. Keep the tab placement and style consistent across your product pages. Users should know where to find information consistently. If possible, use the same tab structure for all products to create a standardized experience.
5. Mobile-First Approach
When designing your tabs, consider a mobile-first approach. Ensure that the mobile experience is smooth and intuitive. Tabs should be easily accessible and user-friendly on all devices, including smartphones and tablets.
6. Regularly Update Content
Keep your tabbed content up-to-date. Remove outdated information and add new details, reviews, or FAQs as needed. An outdated product page can lead to a poor user experience and potentially drive customers away.

Conclusion
Adding tabs to your Shopify product pages is a simple yet effective way to improve the user experience, enhance the organization of product details, and reduce clutter. Whether you choose to use Shopify themes, custom code, or apps like GemPages, you now have the knowledge to create clean and user-friendly product pages that customers will appreciate.
By following the tips provided, such as using descriptive titles, prioritizing information, and maintaining consistency, you can ensure that your tabs are not only visually appealing but also highly functional. If you are looking for the fastest and smartest way to add tabs in Shopify product pages, GemPages is always a good approach.


 Facebook Community
 Change Log
 Help Center


