How to Add Products to Shopify: A 5-Step Instructional

Creating an online store on Shopify is a great first step toward earning money online, but to make your first sale, you’ll need to list your products on the platform.
If you have no idea how to add products to Shopify, you've come to the right place. In this article, we'll give you step-by-step instructions on adding products to Shopify, so you can start build your store immediately.
There are also a slew of helpful tips and tricks waiting for you along the way to ensure you get the most out of your product listings.
5 Easy Steps to Add Products to Shopify
Step 1: Add a Product Title and a Product Description
From your Shopify admin dashboard, click Products > Add product. This will take you to a window where you need to provide essential information about your product.

Please note that you don't need to enter every product detail. You can fill in the most crucial ones first, and add more information as you go.
At this step, give your product a name and write a detailed description.
Since your online customers don't have the means to try your product, you want to help them better understand what your product is and make them envision their life with your product in it.

As you write titles and descriptions for your products, remember:
- Always include keywords in your product titles and product descriptions. Keywords are words and phrases that potential customers often enter into a search engine to find products like yours.
- The product title should be brief and get straight to the point. The basic format for a product title is the brand name, keywords, and the variant (color, flavor, size).
- The product description should never be a long list of features and specs. Try to avoid being bored. Instead, tempt your visitors with sensory words, social proof, and even mini-stories–there are more tips for writing compelling product descriptions below.
Step 2: Add Media
Next, click Add file to upload images, videos, or 3D models of your product. You can add them by dragging and dropping your files, importing them from your computer, or adding them from a URL.

You need to ensure the media you add for your products are high resolution and meet the required specifications to be displayed properly.
- Product images: The best file format for Shopify product images is PNG, followed by JPEG and GIF. Product images need to be smaller than 20 MB to be added to Shopify.
- Videos: The maximum video length is 10 minutes, and the maximum file size is 1 GB. The best resolution for a video on Shopify is 4K.
- 3D models: Your 3D models should be formatted in GLB or USDZ. If your 3D model file exceeds 15 MB, Shopify will automatically optimize the file to keep the quality high but reduce the size.
Step 3: Add Pricing, Inventory, Shipping, and Options
1. Pricing
When you have finished uploading your media, the next step is to add pricing for your products.

'Price' is what you pay at the checkout, while 'Compare at price' is the original price for a product on sale.
For instance, if you set $99 as the 'Compare at price' and leave ‘Price’ at $49, the product will be displayed as $50 off. If the product is not on sale, you can leave this field blank.
The 'Cost per item' allows you to track the cost of goods that you're selling. If you resell a product, enter the price you paid the manufacturer, excluding taxes, shipping, or any additional costs.
Or, if you produce the product on your own, enter a value that is based on your material and labor costs. You can then track your product data and create reports to analyze your profits (reports are only available on the Shopify plan or higher).
Click 'Charge tax on this product' if the product is taxable.
2. Inventory
As you continue down the page, you will see the Inventory section.

At the field 'Inventory will be stocked at', select your physical address if you manage the inventory yourself.
Or, if you have your inventory managed by a third-party app, you can choose the second option (in this case, it's an app called Spocket).
The 'Stock keeping unit', also known as SKU, is a unique value for the product. SKUs help you organize your stock and fulfill orders more efficiently. If you're new to SKUs, you get to make up your own format that makes sense to you.
You also see an option next to the right: Barcode. If you're just starting out and only selling online, you don't need to worry about this field yet.
If 'Track quantity' is checked, the Shopify admin will track the quantity for this product. If you only have a specific amount of stock tracking inventory is essential to ensure you're not selling an item that is out of stock.
You can also choose 'Continue selling when out of stock' if you are confident you can keep up with the demand and will restock your items quickly.
Next, enter the number of units in stock under 'Quantity'. If you have more than one business location, your inventory layout looks slightly different from our example.
3. Shipping
Under the Shipping section, tick on the box 'This is a physical product' if you're selling a physical product and it needs to be delivered.
But if you're selling digital products or services that don't need to be shipped, leave this box unchecked.

Now, enter the weight of the product. You need to include an accurate product weight so that your customers are charged the correct amount for shipping.
In the drop-down menu on the right, you will see different measurements: pounds, ounces, kilograms, and grams. Choose the measure that best fits your product.
If you don't add a weight value to your products, then the weight will be set to 0.1 lb by default.
The Customs Information is only for cross-border selling. If you wish to ship this product internationally, you need to enter the Country/Region of origin.
You are also required to fill in the HS (Harmonized System) code. These codes allow customs authorities to determine the correct tariff to apply to the product. You can find the HS code for your product by searching by keyword in the HS code field.
Shipping costs are something that you have to deal with if you intend to make money on Shopify. It's up to you whether these fees get added to your customer’s bills or you cover shipping costs yourself.
But still, we want you to know that 66% of consumers expect free shipping for all online orders, and nearly 48% of shoppers abandon their carts because of shipping fees.
With these stats in mind, we recommend offering your customers free shipping by including the shipping cost in your overall price rather than adding these extra fees during the checkout process.
How to Do Free Shiping on Shopify? (+Evergreen Tips)
How does Shopify Shipping work: Easy Set-Up Guide, Tips and Tricks (2023)
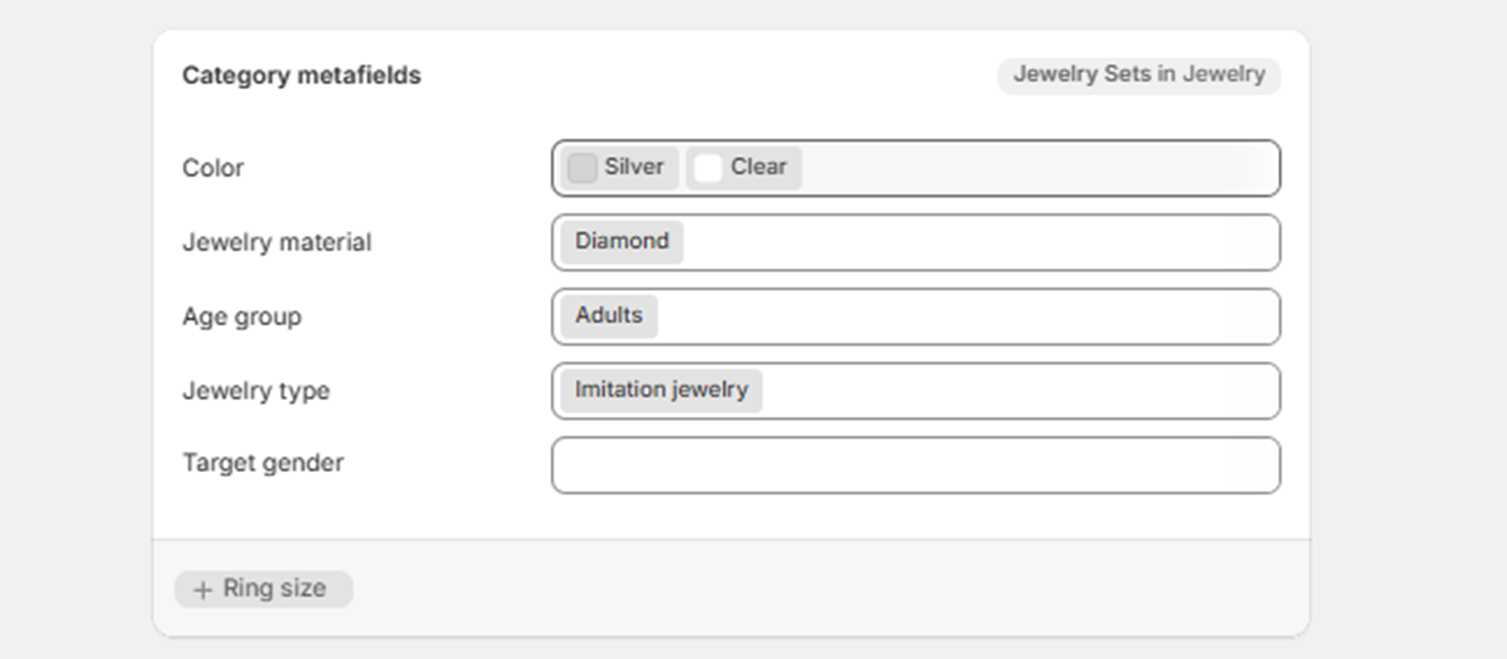
4. Category metafields

Next, if your product has options, like color, material, age group, type, or size, you can create a variant in the Category metafields.
When you finish entering the variants, the Variants section will show up. Of course, you need to provide the quantity of its variant and the price (in case each variant comes with different pricing).
Step 4: Edit The Search Engine Listing
As you move further down the page, you will see the Search engine listing section. This shows a preview of how your product appears in search engine results, like Google and Bing.
Click on 'Edit' to make changes to the preview.
By default, the copy is a duplication of the product title and product description you wrote earlier–most of the time, they are already good to go.
In some cases, however, your copy may get trimmed if it surpasses the character limit.
To be displayed in full in search engine results:
- Keep the product title under 70 characters
- Keep the product description under 320 characters
Step 5: Edit Product Organization and Product Status
Now, scroll back to the top.
On the right side, under the 'Product status' section, you see 'SALES CHANNELS AND APPS'. Choose the channel where you want to sell this product.

Under 'Product organization' are four fields:
- Type: A product can only have only one product type. You can use an available product type or add a custom type.
- Vendor: This is the manufacturer or seller of the product. If you create the product yourself, leave your business name as the vendor. Or, leave it blank if you want.
- Collections: You can add the product directly to a collection. By grouping your products into Shopify collections, you make it easier for your customers to find your products.
- Tags: A product can have multiple tags depending on your settings. Shopify tags help to categorize products and organize search results for your customers.
At the top of the page, you can set up your product status.
If the product is ready to appear on your Shopify store, choose 'Active'. If not, select 'Draft' to store it in your product listings.
Click on 'Save' to finish adding products to Shopify.
Your product is now on your Shopify store, waiting for the first sale!

As you can see, this is a very straightforward way of adding products to your Shopify store. Shopify provides you with all the fields, and you just have to fill them in with the corresponding information.
However, as your store matures with an extensive product catalog, it's wise to import products to Shopify via a CSV sheet or have a third-party app add products in bulk for you.
How to Optimize Your Product Pages for Conversion?
By following our step-by-step instructions above, you're well on your way to high-converting product pages.
Still, there's more work that needs to be done to create truly stellar product pages.
Below, we've rounded up the must-haves of any great product page, so you can easily create winning product pages for your business.
Learn more: Effective Tips to Create Call to Action Buttons that Convert

1. Write Compelling Product Descriptions
Product descriptions are not just acting as back-of-the-box dispensers of information for search engines (though SEO should never be an afterthought).
If well-crafted, product descriptions always pay you back—they help to convince customers to buy and increase your customer’s trust in your brand.

GemPages customer — Monica and Andy describe their organic lounge robe in such an intriguing way!
Here are some areas to keep in mind when writing yours:
- Crafting a short, descriptive paragraph to explain what problems your product helps to solve, what customers gain from your products, and what is your product's competitive edge over others.
- Feel free to add a bit of fun and creativity to sound more human and compelling.
- Include a bulleted list of features and specs. Add any technical details needed.
- Add social proof. Customers are swayed to buy the product with the most positive reviews and testimonials.
- Increase your font size to improve readability.
2. Bring Your Product to Life with Pixel-perfect Visuals
When it comes to selling online, good visuals work better than any sales pitch.
Since customers can't physically interact with your product, they rely on visuals to envision what the product looks and feels like in real life. It means the better your visuals are, the harder they work for you to convince customers that this product is worth purchasing.

GemPages customer—the Des Petis Haus brand snaps multiple shots from different perspectives to show off their product.
Here are the golden rules of product page visuals:
- Include multiple images to display all product variants. Providing customers with a full product view of each color or pattern variant shows them exactly what they can expect, boosting their confidence that YES, they want the green instead of the cornflower sprinkle bag. This also helps to reduce product returns.
- Product videos should be relatively short. Anything from 30 to 90 seconds is good.
- Show off your products from all angles with 3D models. You can also use the GemPages page builder to incorporate 360-degree views of your product. This creates an immersive shopping experience that will raise the bar for your product pages
3. Create Persuasive Calls-to-action
Though a call-to-action (CTA) is not a required element when adding products on Shopify, that in no way means you shouldn’t do it. Quite the opposite!
A CTA button is a critical element that lights a path to your checkout and turns a browser into a customer faster. Hence, it's vital to have your CTA high up on the page—it should be easy to spot and easy to click.

The Body Shop Philippines, a GemPages customer, paints all CTAs in their brand color and puts them underneath the product category introduction.
Here are some top tips for creating CTAs that sell:
- Place your CTAs high up the page, above the fold. Usually, you will see CTAs next to the right of the product images or underneath the product information. You should be able to spot the CTA in under 3 seconds!
- Make your CTAs stand out by using a bright or contrasting color with the background to catch attention and direct your customer’s gaze towards the button.
- Design a big enough CTA button. Whether with a mouse on desktop or a finger on mobile, your CTA button should be large and easy enough on the first attempt.
The good news is instead of customizing your CTA buttons yourself, you can create them in minutes with the GemPages page builder. Just another way we're making it easier to customize page elements for more conversions.
Learn more: Effective Tips to Create Call to Action Buttons that Convert

Wrapping Up
We know leveling up your product-page game is no small feat. You need a clear vision, detailed know-how, and a whole lot of patience to finally enjoy that sweet taste of success.
All the effort you put into adding products to Shopify and tweaking even the tiniest detail will eventually pay dividends.
But if the idea of designing your store pages feels overwhelming, GemPages is more than willing to be your right-hand person. With GemPages, you can build pages that sell, without any coding and create beautiful, and amazing Shopify product pages.


 Facebook Community
 Change Log
 Help Center


