


 Facebook Community
 Change Log
 Help Center


- What are pages in Shopify?
- What is the difference between templates and pages in Shopify?
- Types of Pages for a Shopify Store (+ Examples)
- How to Add a Page to Shopify Store (The Most Basic Pages)
- How to Add a Product Page on Shopify
- How to Add a Collection Page on Shopify
- Best Practices for Creating a Shopify Page
- Wrapping Up
- FAQs About Shopify Page


How to add a page to your Shopify store (in 4 simple steps)
You might be hungry for tips and tricks to boost your online business, but remember, success begins at square one - with your page.
Creating a page for your Shopify store is the first and foremost step to kickstarting your online business. A well-crafted page gets your users to stay on your website with enjoyable and seamless experiences. No matter how big or small your business is, or how many products you’ve got, you absolutely need a “killer” page.
Every page is a building block for a complete customer journey, so right from the get-go, you've got to make sure it's rock solid. This article will give you an A - to - Z guide on how to add a page on Shopify with minimal time and effort.
What are pages in Shopify?
Shopify pages are the foundation of your online store. They are the web pages that make up your site, displaying important information and features for your customers. Each page is designed to help you build a complete and professional-looking store.
The best part is that Shopify pages are flexible. You can customize them using the Shopify theme editor, although there are some limitations. These pages will automatically match the design and features of the theme you’re using, keeping everything consistent across your store.
What is the difference between templates and pages in Shopify?
Templates: The Foundation of Your Shopify Store
Templates in Shopify are pre-designed layouts that control how different types of content appear on your site. Each template is part of a theme, helping to keep a consistent look and feel across similar pages. Examples include templates for product pages, collection pages, and blog posts.
Key Features:
- Structure: Templates organize content into sections that define the layout for specific page types. For example, a product template will have sections for product images, descriptions, prices, and an add-to-cart button.
- Consistency: When you make changes to a template, those changes automatically apply to all pages using that template, keeping the design consistent across similar pages.
- Customization: Templates offer a base design, but you can adjust them to match your brand by adding or removing sections, changing the layout, or modifying other settings.
Pages: The Content of Your Shopify Store
Pages in Shopify are the actual content that visitors interact with on your site. Every store has default pages that help build the structure and improve SEO. For example, a Shopify store usually includes:
- About Us page
- Contact page
- FAQ page
- Policies page
You can customize these pages to fit your needs and create additional pages to organize your content. Writing engaging content and optimizing these pages for search is important for improving your store's conversion rate and organic search rankings.
Types of Pages for a Shopify Store (+ Examples)
Building a Shopify store is not rocket science; however, it might confuse you at first with the various page types needed, such as the homepage, blog, product pages, collection page, etc. Each serves a certain purpose that, together, completes your customer journey.
Don’t worry, as it will all be done in minutes!
But first, let's dive deeper into the key pages that your Shopify store should have.
Homepage
The homepage, like the entrance to your online store, is the first page that visitors see when they land on the website. The purpose of the homepage is to provide an informative and visually appealing introduction to your stores, and then incite visitors to browse your products further. Your future sales will probably start from there, so do not miss the chance to make a good impression.

The Goodflair homepage showcases images that vividly represent the vintage and casual style, perfectly aligned with its mission of selling high-quality used clothing products to eco-friendly young people. The homepage also includes products, collections, a user-friendly navigation bar, and CTA buttons.
Product Pages
Product pages are designed to provide comprehensive information about individual products or services, including features, images, specifications, pricing, product comparisons, shipping, etc. By showcasing transparent details, the product page helps potential customers feel more confident in making a purchase, and, ultimately, driving sales.

A product page for Lucyandyak provides detailed information about the photos, prices, sizes, delivery choices, and payment options for each item of clothing.
Learn more: Shopify Tutorial: How to Set Up A Shopify Store from Scratch for Beginners (2023)
Collection Pages
Let's imagine that you are running an online clothing store and are preparing to launch a “Winter Collection”. On the website, you need a page to showcase curated groups or categories of clothing that are suitable for the winter season. That’s when the collection page comes in.
Collection Pages group and categorize items that share a common theme such as style, season, or function. Customers who are specifically interested in a specific group of products and services can easily browse and find relevant options on collection pages
This facilitates the buying process and makes it easier for them to make a purchase.

Allbirds' new arrivals collection for women includes a range of shoes specifically designed for women.
Pro tip: Try a third-party app to help you create a Collection page to optimize your store
About Us Page
While some sellers may view the About Us Page merely as an introduction, it holds greater significance as a gateway to establish trust and engagement with your customers. This page should explicitly convey your mission, stories, history, values, and other relevant details.

The About Us page of GiveMeTap tells the inspiring story of how the business was born, which highlights its mission of giving back to the community.
Contact Us Page
Customer support is indispensable in the customer journey. This page is dedicated to providing contact information, such as a hotline, email, fax, etc., to ensure that customers can get in touch with your store for any support or inquiries.
What’s more? It can serve as an intelligent platform to gather email subscriptions or customers’ information.

Common Heir addresses customers' concerns regarding orders, returns, and general questions by providing contact information on its Contact Us page.
FAQ Page
There is a fact that when a customer lands in your FAQ section, they’re probably at a critical stage in your sales funnel. They are seeking more information before deciding to make a purchase. Addressing customer concerns can convert potential customers. So, it’s important to add an FAQ page that provides comprehensive answers to the most common questions.

The common questions regarding orders and their corresponding answers are listed on the Pawtrait FAQ page.
Great, you're fully equipped with all the components needed to construct an online store. Let’s start to build your Shopify store by adding a page in a few easy steps.
How to Add a Page to Shopify Store (The Most Basic Pages)
Let’s begin with the fundamental pages before getting into the more specialized ones, like product and collection pages.
Here is a step-by-step guide that helps you add the most basic of pages, whether it is the Homepage, About Us page, Contact Us page, or FAQ page, in minutes.
Step 1: Log in to the Shopify admin
First, access your Shopify account using your login credentials. Once successfully logged in, you will be directed to the Shopify store dashboard, where you can take care of your store's ins and outs.

The Shopify store dashboard, where you can manage all elements of your store.
Step 2: Add a new page to your store
Go to the Online Store tab in the left sidebar. Then, click Pages from the dropdown menu. This will take you to the Pages section, which enables you to view the existing pages and create new ones.

In the upper right corner, click on the Add page button to proceed to the page creation screen.

Step 3: Add details
Now, it’s time to set up your new page. Fill in the provided fields, including Title and Content, to show your intentions for the page.
Shopify also offers you some suggestions for the title box like Contact us, FAQs, About us, etc.

Use the text editor to create the desired content for your page with images, videos, and other elements you want.
Make your store shine by selecting a theme template from your current Shopify theme.
Optionally, you can enhance your page's visibility in search engine results by clicking Edit website SEO. Edit the page title, description, and URL for better SEO optimization.

Step 4: Set the visibility date and publish
Once you’ve done entering all the necessary details, head to the right sidebar to set whether your page is Hidden or Visible.
By default, your page will go live as soon as you save it. However, you can adjust the publishing plan by selecting the Hidden option and setting the post date.
Pro tip: If you desire more flexibility in creating a tailored page, we recommend trying a page builder like GemPages to enjoy access to 80 high-converting pre-made templates and an effortless drag-and-drop editor.

How to Add a Product Page on Shopify
A product page is a virtual storefront where customers learn about your product and make informed purchase decisions.
On Shopify, each product automatically has its own dedicated page. That's why adding a product page to your Shopify store differs slightly from creating fundamental pages, as guided before.
Here’s a step-by-step guide on how to create a product page on Shopify.
Step 1: Go to “Products" in the main dashboard
From the Shopify admin dashboard, navigate to the Products tab on the left sidebar. This is where you can keep track of product inventory.

Step 2: Click the “Add product” button
In the upper right corner, hit the Add product button to create a new product page. Then you will be immediately navigated to the product detail page.
Step 3: Set up your product page

Now it’s time to create a product page that will leave your audiences in awe. Fill in the required details for your product and make it stand out with a clear and catchy title. Don't forget to add compelling descriptions along with eye-catching photos and other media that keep customers engaged.
Remember that the more details you offer on the product, the more confident and informed customers will feel about their potential purchase. This helps facilitate the buying process and reduces the likelihood of abandoning a cart due to a lack of information.
Here are some key things you should consider adding:
- Pricing: Set the price of your products, including details like compare-at price and cost per item.

- Inventory: Specify the stock quantity for each product to track your products’ inventory and display the amount available.
- Shipping: Set up shipping options and offer relevant information regarding shipping costs, delivery times, weight, dimensions, etc.
- Variants: Add options like size and color
- SKU: Display the SKU, barcode, etc., on each product for inventory control and tracking.
Step 4: Click the “Save" button
Once you are satisfied with the product page, click Save. Now your product page is published as part of your Shopify store.
How to Add a Collection Page on Shopify
Shopify's intuitive interface makes it easy for you to add a collection page to your online store. Of course, you need to create a product collection first in order for a collection to be displayed on specific pages.
Step 1: Create a collection
From your Shopify admin dashboard, go to Products > Collections > Create collection to add a new collection.

Step 2: Set up your collection page
Add a title and description for the collection.

Adding collections in Shopify can be done in two ways: manually or automatically.
With the manual collection option, you simply handpick the products you want to include. However, it will take more time and effort to add or remove products individually.

Back to the Product page, you can choose Collection for each product.
On the other hand, the automated option offers more versatility. Using set conditions based on product types, styles, prices, and more, the collection is automatically input with products that meet the specified criteria.

Step 3: Click the “Save" button
Once you’ve completed all the settings and added products, click Save to create the collection.
Best Practices for Creating a Shopify Page
Clear structure
You only have mere seconds to capture visitors to your store, so make your page clear and intuitive for users to skim and understand when they are browsing. Ensure a seamless flow of information by organizing your page elements logically. You can break up text using headings, subheadings, and bullet points to make it easier for users to skim.
Compelling content
Adding a new page on Shopify is essential, but at the end of the day, it is content that truly sets your store apart from the rest. It is the secret sauce that engages your audiences, builds trust, and leaves a lasting impression about your business.
Content must address your customer’s needs and desires, going beyond the surface and diving deep into what makes your products special. By combining exceptional content, you’ll elevate your page from ordinary to extraordinary.
And let's not forget that visuals are just as important as words. Use high-quality images and videos to enhance the visual appeal of your page and captivate your visitors.
Learn more: The Art of Storytelling in Online Retail
Streamlined customization with GemPages
To be honest, while Shopify offers many great features to add pages with ease, it may not fully meet your needs for a truly unique online store due to the limitations of the Shopify template library and editor.
That’s why page builders like GemPages come in. GemPages was designed to empower e-sellers with unlimited abilities to create stunning web pages that are tailored to their brand and products.
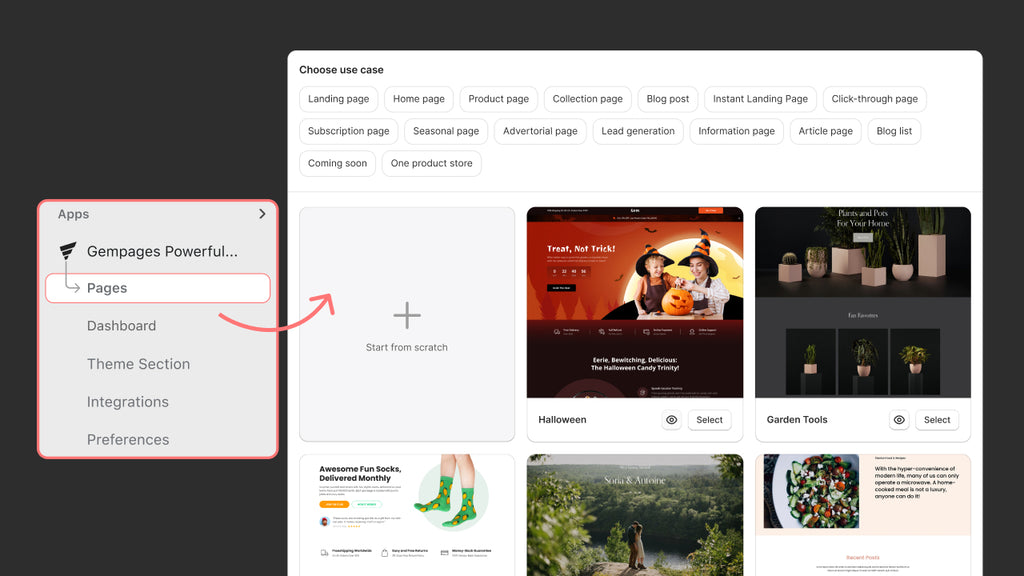
Once integrating GemPages with your Shopify store, you can have access to high-converting pre-built templates to get inspired for every page you want to create.
 GemPages offers a vast library of templates for various page types.
You will have the freedom to customize and design your page exactly as you envision without the need for coding skills. The revolutionary Image-to-Layout feature that automatically generates a fully editable layout that looks like your input will make the building process faster, smarter, and more enjoyable.
 Create and customize any page easily with drag and drop editor from GemPages.
Pro tip: If you’re looking for a smarter, faster way to build and customize Shopify store pages, then Image-to-Layout - an AI feature included in GemPages, might be the perfect tool for you.
Wrapping Up
In today’s digital world, starting an online business has never been easier with streamlined tools and platforms. Through our comprehensive A to Z guide on how to add a new page on Shopify, we hope you can bring your vision to life, create a unique store that truly reflects your brand, and win the audience's hearts and minds.
In addition to the Shopify dashboard, we recommend elevating the store building process by using GemPages to break free from any limitations. Embrace the ease and flexibility to embark on a successful online business journey.
FAQs About Shopify Page


